Android Development: main() Method, Application Lifecycle, and Event Handling
 So, I was going through some tutorials in Android development and along the way created my first applications that just demonstrate the programming features that are available in Android. It does not seem to me a far fetch programming paradigm as this is mostly familiar to someone with a windows or web development background, but with some subtle differences of course. My purpose for this post and future posts as well is to list these nuances.
The first thing that a windows or web developer will ask, who is just beginning Android development, is how an Android application is started, thus the following question.
Is there a main() method in Android? There is no main() method but there is one similar to it, the main activity’s onCreate() method.
Main activity is the first activity that is run by the Android OS when launching an android app. The main activity is defined in the AndroidManifest.xml file.
<?xml version=“1.0” encoding=“utf-8”?> <manifest xmlns:android=“http://schemas.android.com/apk/res/android” package=“com.example.app” >
<application
    android:allowBackup\="true"
    android:icon\="@drawable/ic_launcher"
    android:label\="@string/app_name"
    android:theme\="@style/AppTheme" \>
    <activity
        android:name\="com.example.app.MainActivity"
        android:label\="@string/app_name" \>
        <intent-filter\>
            <action android:name\="android.intent.action.MAIN" />

            <category android:name\="android.intent.category.LAUNCHER" />
        </intent-filter\>
    </activity\>
</application\>
</manifest>
All android apps contain at least one activity. An activity is much like a web page, in that it defines the screen layout and the behavior. The activity’s screen layout is defined in an XML markup file.
<RelativeLayout xmlns:android=“http://schemas.android.com/apk/res/android” xmlns:tools=“http://schemas.android.com/tools” android:layout_width=“match_parent” android:layout_height=“match_parent” android:paddingLeft=“@dimen/activity_horizontal_margin” android:paddingRight=“@dimen/activity_horizontal_margin” android:paddingTop=“@dimen/activity_vertical_margin” android:paddingBottom=“@dimen/activity_vertical_margin” tools:context=“com.example.app.MainActivity”>
<Button
    android:layout_width\="wrap_content"
    android:layout_height\="wrap_content"
    android:text\="Click me!!!"
    android:id\="@+id/button"
    android:layout_marginTop\="30dp"
    android:onClick\="buttonOnClick"
    android:layout_alignParentTop\="true"
    android:layout_centerHorizontal\="true" />

<TextView
    android:layout_width\="wrap_content"
    android:layout_height\="wrap_content"
    android:textAppearance\="?android:attr/textAppearanceLarge"
    android:text\="No text..."
    android:id\="@+id/textView"
    android:layout_below\="@+id/button"
    android:layout_centerHorizontal\="true"
    android:layout_marginTop\="22dp" /> </RelativeLayout\>
The activity’s behavior is defined in a Java class.
public class MainActivity extends Activity { // @Override protected void onCreate(Bundle savedInstanceState) { super.onCreate(savedInstanceState); setContentView(R.layout.activity_main); } // public void buttonOnClick(View v) { Button b = (Button) v; b.setText(“I’ve Been Clicked!”); // TextView t = (TextView) findViewById(R.id.textView); t.setText(“You Clicked Me!”); } }
So for every screen that your android app will need, you usually create an activity. The main activity’s onCreate() method is called by the Android OS when the app is launched.
So what’s in the app’s lifecycle? Well, an android app goes through different states in its lifecycle as a user navigates through, out of, and back to it, such as, when the user receives a phone call or switches to another app, when the user is not actively using it, when the user leaves your app and return to it a later time; and when the screen rotates between landscape and portrait orientation.
Knowing the different states in the lifecycle, how to take advantage of them by making sure your app does not crash, does not consume valuable system resource, and does not lose the user’s progress, will make you a good android app developer.
The figure below describes the states an android app goes through and the different lifecycle callbacks that the system calls and that the app can implement.
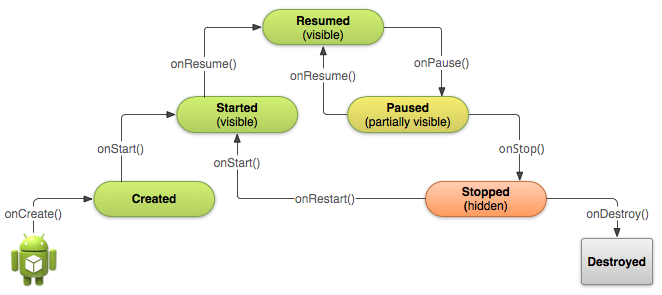
So when the app is launched, it is created, started, and resumed, and stays in the resumed state until it is paused, and stays in the paused state until it is resumed, or stopped and stays in a stopped state until it is restarted or destroyed.
Key points to remember here are:
- Created and Started are transient states, meaning the app does not stay in these states for long. So basically the app is created, then quickly started, and immediately goes into a resumed state and stays there for some time.
-
Resumed, Paused, and Stopped are static states, meaning these are the possible states that the app maybe currently in at any given time. The difference between these 3 states are:
- Resumed or “running” state is when the activity is in the foreground and the user can interact with it.
- Paused state is when the activity is partially obscured by another activity, usually a dialog window. The other activity that is in the foreground is semi-transparent or does not cover the entire screen. The paused activity does not receive input and cannot execute code.
- Stopped state is when the activity is completely hidden and not visible to the user, thus it is in the background. The activity instance and all its state information is retained, but it cannot execute any code.
- Destroyed state is when the activity is completely removed from the system memory.
- An activity is destroyed when the user presses the back button, or when it terminates itself, or when the system terminates it if it’s currently stopped and hasn’t been used in a long time or the other activity that is in the foreground requires more resources that the system must shut down background processes to recover memory.
- If the system terminates an activity due to system constraints, the system retains the state of the activity such that when the user navigates back to it, it creates a new activity instance and brings it back to the state it was in when it was destroyed using the saved data.
Managing the Activity Lifecycle from the Android Developer website explains it in more detail including when to implement the different lifecycle callbacks.
What’s different then in handling events in Android? Similar to how you handle events on windows, you do the same in Android but with some caveat. You should know that the easiest way to handle event is to create a function, an event handler function, and assign this function to the object’s event through the properties windows. You can still do this in Android but only with the onClick event unfortunately.
public void onButtonClick(View v) { // process event }
For other events, you need to code them by hand. There are 3 ways to hookup to an object’s event using code:
- Creating a subclass of the object’s event listener and creating an instance of it.
@Override protected void onCreate(Bundle savedInstanceState) { // … Button button = (Button) findViewById(R.id.button); MyOnClickListener Listener = new MyOnClickListener(); button.setOnClickListener(Listener); } // public class MyOnClickListener implements View.OnClickListener { public void onClick(View v) { // process event } }
- Implementing the object’s event listener interface in the activity class.
public class MainActivity extends Activity implements TextView.OnEditorActionListener { // @Override protected void onCreate(Bundle savedInstanceState) { // … EditText et = (EditText) findViewById(R.id.editText); et.setOnEditorActionListener(this); } // @Override public boolean onEditorAction(TextView textView, int i, KeyEvent keyEvent) { TextView t = (TextView) findViewById(R.id.textView2); t.setText(textView.getText()); return true; } }
- Using an anonymous class
Button b = (Button) findViewById(R.id.button); b.setOnClickListener(new View.OnClickListener() { @Override public void onClick(View view) { TextView t = (TextView) findViewById(R.id.textView2); t.setText(“Regular button”); } });